
自動・半自動機械用
プラスチックホック
設定注意(中文)
-
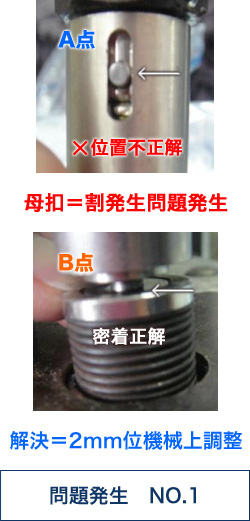
SOCKET=問題発生
-
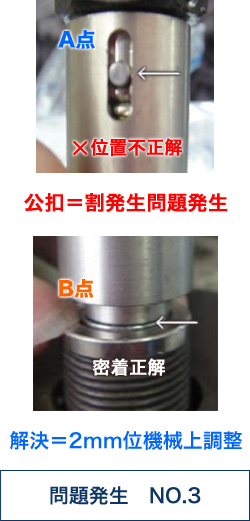
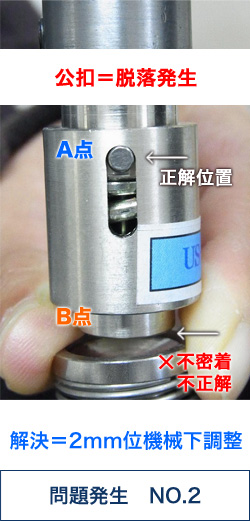
STUD=問題発生
-
STUD=問題発生
機械設定正解&問題発生防止(中文)
-
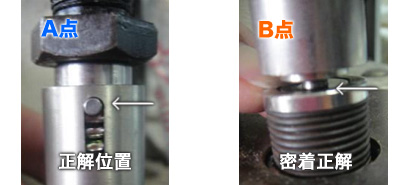
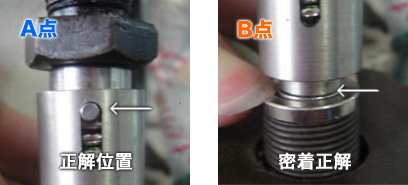
SOCKET=設定正解
-
STUD=設定正解
機械調整手順
English
-

-
Make Procedure the machine
1. Switch Off power of the machine
2. Set up the moulds
3. Turn round the screw, make it to the top
4. Tread foot board once, then turn round the pulley Make moulds to the lowest level.
5. Adjust the screw, make SOCKET&STUD moulds Splicing with CAP mould.
Then lock the screw.
while setting, parallel-needle must be on top-level.
6. Complete the setting device.
7. Draw a design according to the samples we provided Validity check the chimerism.
8. Operating on the same situation.
9. Contact us while meeting problems.
Debug key point:
Different to traditional moulds, new are integrated design with machine.
Please read the informations and make sure you understand.
This simple operation procedure is slos appropriate for new-hand.
Notice:
1. Prevent high-pressure, as parallel-needle descend, could cause buttons fracture or too tight.
2. Once finishing debug, could insure no matter thick or thin of the fabrics.
Effectively prevents the problems, such as drop off, breakage,
Insufficient penetrating power, etc.
中文
-
-
钉扣机调整歩驟
1. 关掉机器电源。
2. 装上模具。
3. 旋转机器螺丝、将螺丝调整到最高。
4. 脚踏一下机器踏板、用手转动皮帯轮使模至最下方。
5. 向下旋转螺丝、使公母扣模及面模能碰着的位置。
注意
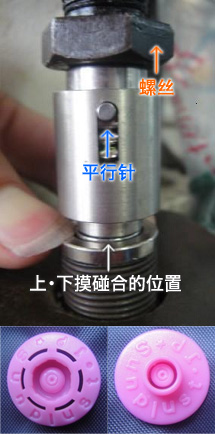
设定模具时、会发生平行针下压的问题。装配模具时、
平行针在观察口的顶部为正确 位置。
在上下模碰合的位置、锁紧机器的螺丝。
6. 机器调试完成。
7. 打样时、请参照提供的样品。以确认(扣合、打开)的嵌合力及芯点等。
8. 同等条件下开始操作。
9. 如有不同情況、请与我司联系。
新式模具和半自动钉扣机一体化的压力调试方法(与传统模具完全不同)
请阅读说明书、必须充分了解调试的基本歩骤后开始作业。
簡単的调试方法也适用于新手。
注意说明:
1. 设定压力过强、会导致平行针下压
从而导致扣子破裂、嵌合力过紧请注意平行针是否移动、边看边设定。
2. 一经调试后、可确保无关布料厚薄度的嵌合力(厚料也可适用)
(有效防止扣子的脱落、断裂、穿透力不足等)
日本語
-
-
機械調整手順 すべての半自動機械の設定方法
1. 機械の電源を切る
2. MOLDを取り付ける
3. 機械ネジを緩め、調整ネジを一番上まで上げる
4. ペタルを踏み、ベルトが付いているプーリーを廻し、一番下まで下げる
5. SOCKET&STUDのMOLDがCAPのMOLDに密着位置まで調整ネジを下げる
注意:
設定時に平行ピンは、下へ下がると問題発生する。
MOLD取付時の窓の一番上位置が正しい。密着位置で機械の固定ネジを強く締める。
6. 機械口調整完了
7. SAMPLE生地に取付て、見本提供品と比較する
8. (はめたり・はずして)の篏合を確認、また溜まりを確認
9. 同等の場合は作業開始:違う場合は連絡ください
設定ポイント:
新MOLDは半自動機械と一体のカシメ方法です(従来品とは全く違う)
機械を手で廻して一番下の位置にする
MOLDが付いた調整螺子を一番上まで上げる
上駒(SOCKET・STUD)の駒とCAPの下駒が接する迄調整螺子を下げて締める
条件. 設定時に平行ピンが動いていない事が重要
